From inside (document excerpt):
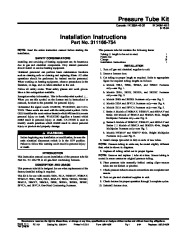
Pressure Tube Kit Cancels: IIK 398A-40-32 IIK 340M-40-2 8-15-94 Installation Instructions Part No. 311166-754 NOTE: Read the entire instruction manual before starting the installation. SAFETY CONSIDERATIONS Installing and servicing of heating equipment can be hazardous due to gas and electrical components. Only trained personnel should install or service heating equipment. Untrained personnel can perform basic maintenance functions such as cleaning coils or cleaning and replacing filters.
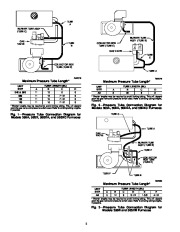
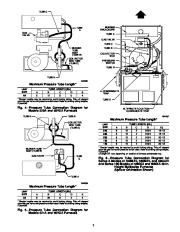
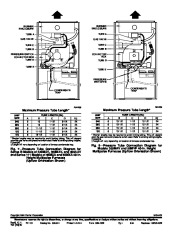
All other operations should be performed by trained service personnel. When working on heating equipment, observe precautions in the literature, on tags, and on labels attached to the unit. Follow all safety codes. Wear safety glasses and work gloves. Have a fire extinguisher available Recognize safety information. This is the safety-alert symbol When you see this symbol on the furnace and in instructions or manuals, be alert to the potential for personal injury. Understand the signal words DANGER, WARNING, and CAUTION. These words are used with the safety-alert symbol. DANGER identifies the most serious hazards which will result in severe personal injury or death. WARNING signifies a hazard which could result in personal injury or death. CAUTION is used to identify unsafe practices which would result in minor personal injury or product and property damage. This pressure tube kit contains the following items: Tubing (1 length to be cut to size) Plastic tee Clamps Installation Instructions INSTALLATION 1. Turn off gas and electrical supplies to unit. 2. Remove furnace door. 3. Cut tubing to proper length as required. Refer to appropriate figure for required tubing lengths as follows: a. Models 398A, 58SX, 58SXA, and 58SXC Furnaces only–see Fig. 1. b. Models 399A, 58DX, 58DXA, and 58DXC Furnaces only–see Fig. 2. c. Models 398B and 58SXB Furnaces only–see Fig. 3. d. Models 320A and 58VUA Furnaces only–see Fig. 4. e. Models 321A and 58VCA Furnaces only–see Fig. 5. f. Series A Models of 340MAV, 350MAV, and 490AAV and Series 100 Models of 58MCA and 58MXA 40-in. Height Multipoise Furnaces only–see Fig. 6. g. Series B Models of 340MAV, 350MAV, and 490AAV and Series 111 Models of 58MCA and 58MXA 40-in. Height Multipoise Furnaces only–see Fig. 7. h. Models 355MAV and 58MVP 40-in. Height Multipoise Furnaces only–see Fig. 8. 4. Install clamps (provided in kit) on ends of new tubes. NOTE: Pressure tubing in units may be routed slightly different than what is shown in diagrams. 5. Replace all tubing called out in proper figures. NOTE: Remove and replace 1 tube at a time. Ensure tubing is routed in same manner as original pressure tubing. 6. Place pressure tube assembly behind casing clips–ensure tubes are not kinked or pinched. 7. Check pressure tubes to ensure connections are completed and secure. 8. Turn on gas and electrical supplies to unit. 9. Check furnace for proper operation through 2 complete cycles. 10. Reinstall furnace door. 1 3 18 1 Before beginning any installation or modification, be sure the main electrical disconnect switch is in the OFF position. Failure to follow this warning could result in personal injury or death. INTRODUCTION This instruction manual covers installation of the pressure tube kit Part No. 311166-754 in all gas-fired condensing furnaces. DESCRIPTION AND USAGE This pressure tube kit is designed for use when replacement of the factory-installed tubing is required. This kit is for use with models 320A, 321A, 340MAV, 350MAV, 355MAV, 398A, 398B, 399A, 490AAV, 58DX, 58DXA, 58DXC, 58MCA, 58MVP, 58MXA, 58SX, 58SXA, 58SXB, 58SXC, 58VCA, and 58VUA Gas-Fired Condensing Furnaces.


 Carrier Owners Manual - 1 of 4
 Carrier Owners Manual - 2 of 4
 Carrier Owners Manual - 3 of 4
 Carrier Owners Manual - 4 of 4